Building VS Code Extensions in 2026: The Complete Modern Guide
Master VS Code extension development in 2026. Learn TypeScript, React webviews, AI integration with Ollama, and publishing to the marketplace. Includes real-world examples and open-source templates.

Visual Studio Code dominates the developer tools landscape with over 70% market share among developers. Its extension ecosystem—with 50,000+ extensions—is a major reason why. Whether you want to integrate AI into your workflow, build custom file managers, or create productivity tools, VS Code extensions let you shape your IDE to match exactly how you work.
In this comprehensive guide, I'll walk you through modern VS Code extension development using the latest patterns, tools, and APIs. We'll cover everything from basic setup to advanced topics like React-powered webviews and local AI integration with Ollama—all based on real extensions I've built and published.
What You'll Learn
By the end of this guide, you'll understand:
- How to set up a modern VS Code extension project with TypeScript and esbuild
- The VS Code Extension API architecture and key concepts
- Building rich UI with React webviews and TailwindCSS
- Integrating local AI models using Ollama
- Working with file systems, including remote SSH/SFTP
- Publishing your extension to the VS Code Marketplace
Real-World Examples: I'll reference two extensions I've built—ClarifAI for AI-powered code analysis and File Explorer for advanced file management—plus a React starter template you can use to jumpstart your own projects.
Understanding VS Code Extension Architecture
Before writing code, let's understand how VS Code extensions work at a high level.
Extension Host Process
VS Code runs extensions in a separate process called the Extension Host. This isolation provides several benefits: extensions can't crash the main VS Code process, they have their own memory space, and VS Code can manage extension lifecycle independently.
Your extension communicates with VS Code through a well-defined API. The key components are:
Activation Events: Define when your extension loads. Extensions aren't loaded until needed, improving VS Code's startup time.
Contribution Points: Declare what your extension adds to VS Code—commands, views, settings, languages, themes, etc.
VS Code API: The vscode module provides access to the editor, workspace, windows, and more.
Extension Manifest (package.json)
The package.json file is the heart of your extension. It declares everything VS Code needs to know:
{
  "name": "my-extension",
  "displayName": "My Extension",
  "version": "1.0.0",
  "engines": {
    "vscode": "^1.105.0"
  },
  "activationEvents": [],
  "main": "./dist/extension.js",
  "contributes": {
    "commands": [
      {
        "command": "myExtension.helloWorld",
        "title": "Hello World"
      }
    ],
    "viewsContainers": {
      "activitybar": [
        {
          "id": "myExtension",
          "title": "My Extension",
          "icon": "media/icon.svg"
        }
      ]
    }
  }
}
Setting Up a Modern Extension Project
Prerequisites
Ensure you have the following installed:
- Node.js 18+ (LTS recommended)
- VS Code 1.105.0 or higher
- Git for version control
Project Initialization
The fastest way to start is using the Yeoman generator:
# Install the generator globally
npm install -g yo generator-code

# Generate a new extension
yo code

# Follow the prompts:
# ? What type of extension? New Extension (TypeScript)
# ? Extension name? my-extension
# ? Identifier? my-extension
# ? Description? My awesome extension
# ? Initialize git repository? Yes
# ? Which bundler? esbuild
# ? Which package manager? npm
Modern Project Structure
A well-organized extension looks like this:
my-extension/
├── .vscode/
│   ├── launch.json          # Debug configurations
│   ├── tasks.json           # Build tasks
│   └── settings.json        # Workspace settings
├── src/
│   ├── extension.ts         # Main entry point
│   ├── commands/            # Command handlers
│   ├── providers/           # Tree views, webviews, etc.
│   ├── services/            # Business logic
│   └── utils/               # Helper functions
├── media/                   # Icons, images, stylesheets
├── dist/                    # Compiled output
├── package.json             # Extension manifest
├── tsconfig.json            # TypeScript configuration
├── esbuild.js               # Build configuration
└── .vscodeignore            # Files to exclude from package
TypeScript Configuration
Modern extensions use strict TypeScript for type safety:
{
  "compilerOptions": {
    "module": "Node16",
    "target": "ES2022",
    "lib": ["ES2022"],
    "outDir": "dist",
    "rootDir": "src",
    "strict": true,
    "esModuleInterop": true,
    "skipLibCheck": true,
    "forceConsistentCasingInFileNames": true,
    "moduleResolution": "Node16",
    "resolveJsonModule": true,
    "declaration": true,
    "sourceMap": true
  },
  "include": ["src/**/*"],
  "exclude": ["node_modules", "dist"]
}
esbuild Configuration
esbuild is the recommended bundler for VS Code extensions—it's incredibly fast and produces optimized bundles:
// esbuild.js
const esbuild = require("esbuild");

const production = process.argv.includes("--production");
const watch = process.argv.includes("--watch");

async function main() {
  const ctx = await esbuild.context({
    entryPoints: ["src/extension.ts"],
    bundle: true,
    format: "cjs",
    minify: production,
    sourcemap: !production,
    sourcesContent: false,
    platform: "node",
    outfile: "dist/extension.js",
    external: ["vscode"],
    logLevel: "info",
    plugins: [
      {
        name: "watch-plugin",
        setup(build) {
          build.onEnd((result) => {
            if (result.errors.length === 0) {
              console.log("[watch] build finished");
            }
          });
        },
      },
    ],
  });

  if (watch) {
    await ctx.watch();
  } else {
    await ctx.rebuild();
    await ctx.dispose();
  }
}

main().catch((e) => {
  console.error(e);
  process.exit(1);
});
Your First Extension: Hello World
Let's start with the basics. Here's a minimal extension that shows a notification:
// src/extension.ts
import * as vscode from "vscode";

export function activate(context: vscode.ExtensionContext) {
  console.log("Extension activated!");

  // Register a command
  const disposable = vscode.commands.registerCommand(
    "myExtension.helloWorld",
    () => {
      vscode.window.showInformationMessage("Hello from My Extension!");
    }
  );

  // Add to subscriptions for cleanup
  context.subscriptions.push(disposable);
}

export function deactivate() {
  console.log("Extension deactivated!");
}
Running and Debugging
Press F5 to launch the Extension Development Host—a new VS Code window with your extension loaded. Open the Command Palette (Cmd+Shift+P / Ctrl+Shift+P) and run your command.
Set breakpoints in your TypeScript code; the debugger works seamlessly.
Building Rich UIs with Webviews
For complex interfaces beyond simple tree views, VS Code provides Webviews—embedded web browsers that can render any HTML/CSS/JavaScript.
When to Use Webviews
Webviews are ideal for:
- Interactive dashboards and forms
- Rich visualizations and charts
- Custom editors
- Settings panels with complex UI
- Any interface that needs React, Vue, or other frameworks
Basic Webview Panel
Here's how to create a simple webview:
// src/providers/WebviewProvider.ts
import * as vscode from "vscode";

export class MyWebviewProvider {
  public static readonly viewType = "myExtension.webview";

  constructor(private readonly extensionUri: vscode.Uri) {}

  public createPanel(): vscode.WebviewPanel {
    const panel = vscode.window.createWebviewPanel(
      MyWebviewProvider.viewType,
      "My Extension",
      vscode.ViewColumn.One,
      {
        enableScripts: true,
        retainContextWhenHidden: true,
        localResourceRoots: [
          vscode.Uri.joinPath(this.extensionUri, "media"),
          vscode.Uri.joinPath(this.extensionUri, "dist"),
        ],
      }
    );

    panel.webview.html = this.getHtmlContent(panel.webview);

    // Handle messages from the webview
    panel.webview.onDidReceiveMessage(
      (message) => {
        switch (message.type) {
          case "showNotification":
            vscode.window.showInformationMessage(message.text);
            break;
          case "getWorkspaceFiles":
            this.sendWorkspaceFiles(panel.webview);
            break;
        }
      },
      undefined,
      []
    );

    return panel;
  }

  private getHtmlContent(webview: vscode.Webview): string {
    const scriptUri = webview.asWebviewUri(
      vscode.Uri.joinPath(this.extensionUri, "dist", "webview.js")
    );
    const styleUri = webview.asWebviewUri(
      vscode.Uri.joinPath(this.extensionUri, "media", "styles.css")
    );

    const nonce = this.getNonce();

    return `<!DOCTYPE html>
    <html lang="en">
    <head>
      <meta charset="UTF-8">
      <meta name="viewport" content="width=device-width, initial-scale=1.0">
      <meta http-equiv="Content-Security-Policy"
            content="default-src 'none';
                     style-src ${webview.cspSource} 'unsafe-inline';
                     script-src 'nonce-${nonce}';">
      <link href="${styleUri}" rel="stylesheet">
      <title>My Extension</title>
    </head>
    <body>
      <div id="root"></div>
      <script nonce="${nonce}" src="${scriptUri}"></script>
    </body>
    </html>`;
  }

  private getNonce(): string {
    let text = "";
    const possible =
      "ABCDEFGHIJKLMNOPQRSTUVWXYZabcdefghijklmnopqrstuvwxyz0123456789";
    for (let i = 0; i < 32; i++) {
      text += possible.charAt(Math.floor(Math.random() * possible.length));
    }
    return text;
  }

  private async sendWorkspaceFiles(webview: vscode.Webview) {
    const files = await vscode.workspace.findFiles("**/*", "**/node_modules/**");
    webview.postMessage({
      type: "workspaceFiles",
      data: files.map((f) => f.fsPath),
    });
  }
}
React + TailwindCSS Webviews: The Modern Approach
For production extensions, React provides the best developer experience. I've created a starter template that sets everything up: React Starter Template.
Project Structure for React Webviews
my-extension/
├── src/
│   ├── extension.ts              # Extension entry point
│   ├── WebviewProvider.ts        # Webview panel provider
│   └── webview/
│       ├── index.tsx             # React app entry point
│       ├── index.css             # TailwindCSS imports
│       ├── App.tsx               # Main app with routing
│       ├── declarations.d.ts     # Type declarations for vscode API
│       └── pages/
│           ├── HomePage.tsx
│           └── SettingsPage.tsx
├── esbuild.js                    # Builds both extension AND webview
├── tailwind.config.js
└── postcss.config.js
Configuring esbuild for React
Your build script needs to bundle both the extension and the React webview:
// esbuild.js
const esbuild = require("esbuild");

const production = process.argv.includes("--production");
const watch = process.argv.includes("--watch");

// Extension build configuration
const extensionConfig = {
  entryPoints: ["src/extension.ts"],
  bundle: true,
  format: "cjs",
  minify: production,
  sourcemap: !production,
  platform: "node",
  outfile: "dist/extension.js",
  external: ["vscode"],
};

// Webview build configuration
const webviewConfig = {
  entryPoints: ["src/webview/index.tsx"],
  bundle: true,
  format: "iife",
  minify: production,
  sourcemap: !production,
  platform: "browser",
  outfile: "dist/webview.js",
  loader: {
    ".tsx": "tsx",
    ".ts": "ts",
    ".css": "css",
  },
  define: {
    "process.env.NODE_ENV": production ? '"production"' : '"development"',
  },
};

async function main() {
  const extensionCtx = await esbuild.context(extensionConfig);
  const webviewCtx = await esbuild.context(webviewConfig);

  if (watch) {
    await Promise.all([extensionCtx.watch(), webviewCtx.watch()]);
  } else {
    await Promise.all([extensionCtx.rebuild(), webviewCtx.rebuild()]);
    await Promise.all([extensionCtx.dispose(), webviewCtx.dispose()]);
  }
}

main().catch(console.error);
React App with VS Code Communication
Here's how the React webview communicates with the extension:
// src/webview/index.tsx
import React from "react";
import { createRoot } from "react-dom/client";
import { BrowserRouter } from "react-router-dom";
import App from "./App";
import "./index.css";

// Declare the VS Code API
declare global {
  interface Window {
    acquireVsCodeApi: () => {
      postMessage: (message: unknown) => void;
      getState: () => unknown;
      setState: (state: unknown) => void;
    };
  }
}

const vscode = window.acquireVsCodeApi();

// Make vscode available globally
(window as any).vscode = vscode;

const container = document.getElementById("root");
const root = createRoot(container!);

root.render(
  <React.StrictMode>
    <BrowserRouter>
      <App />
    </BrowserRouter>
  </React.StrictMode>
);
// src/webview/App.tsx
import React, { useEffect, useState } from "react";
import { Routes, Route, Link } from "react-router-dom";

declare const vscode: {
  postMessage: (message: unknown) => void;
};

function NotificationPage() {
  const sendNotification = () => {
    vscode.postMessage({
      type: "showNotification",
      text: "Hello from React! 🚀",
    });
  };

  return (
    <div className="p-6">
      <h1 className="text-2xl font-bold mb-4">Notification Demo</h1>
      <button
        onClick={sendNotification}
        className="bg-blue-600 hover:bg-blue-700 text-white px-4 py-2 rounded"
      >
        Send Notification
      </button>
    </div>
  );
}

function DirectoryPage() {
  const [files, setFiles] = useState<string[]>([]);

  useEffect(() => {
    // Listen for messages from extension
    const handleMessage = (event: MessageEvent) => {
      const message = event.data;
      if (message.type === "workspaceFiles") {
        setFiles(message.data);
      }
    };

    window.addEventListener("message", handleMessage);
    return () => window.removeEventListener("message", handleMessage);
  }, []);

  const loadFiles = () => {
    vscode.postMessage({ type: "getWorkspaceFiles" });
  };

  return (
    <div className="p-6">
      <h1 className="text-2xl font-bold mb-4">Directory Listing</h1>
      <button
        onClick={loadFiles}
        className="bg-green-600 hover:bg-green-700 text-white px-4 py-2 rounded mb-4"
      >
        Load Workspace Files
      </button>
      <ul className="space-y-1">
        {files.map((file, index) => (
          <li key={index} className="text-sm text-gray-300">
            {file}
          </li>
        ))}
      </ul>
    </div>
  );
}

export default function App() {
  return (
    <div className="min-h-screen bg-gray-900 text-white">
      <nav className="bg-gray-800 p-4 flex gap-4">
        <Link to="/" className="hover:text-blue-400">
          Notifications
        </Link>
        <Link to="/directory" className="hover:text-blue-400">
          Directory
        </Link>
      </nav>
      <Routes>
        <Route path="/" element={<NotificationPage />} />
        <Route path="/directory" element={<DirectoryPage />} />
      </Routes>
    </div>
  );
}
TailwindCSS v4 Configuration
// tailwind.config.js
/** @type {import('tailwindcss').Config} */
module.exports = {
  content: ["./src/webview/**/*.{tsx,ts,jsx,js}"],
  theme: {
    extend: {
      colors: {
        vscode: {
          bg: "var(--vscode-editor-background)",
          fg: "var(--vscode-editor-foreground)",
          border: "var(--vscode-panel-border)",
          button: "var(--vscode-button-background)",
          buttonHover: "var(--vscode-button-hoverBackground)",
        },
      },
    },
  },
  plugins: [],
};
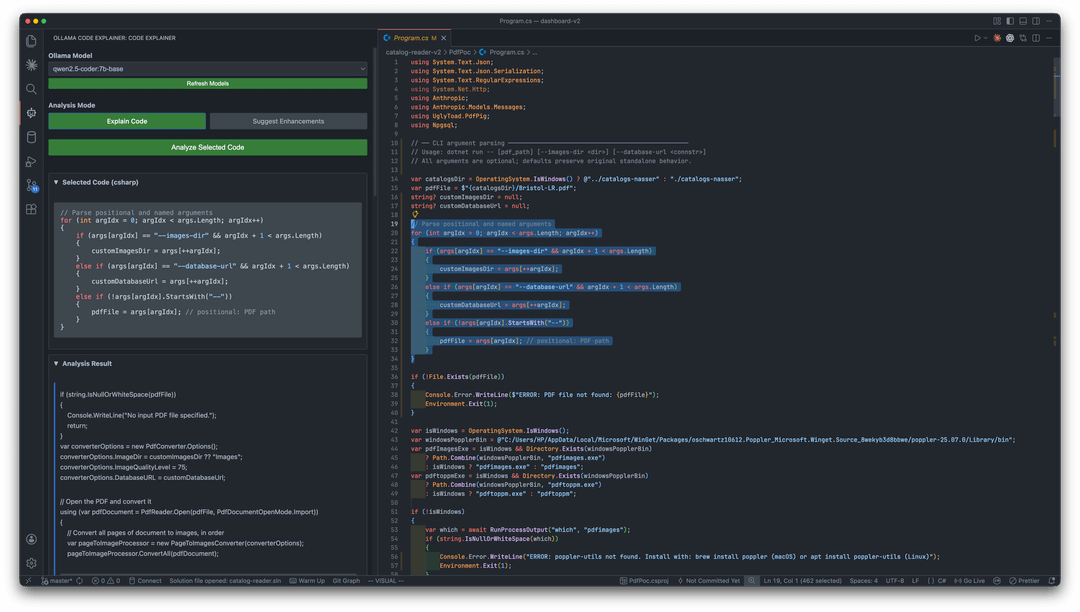
Case Study 1: ClarifAI - AI-Powered Code Analysis
Let me walk you through ClarifAI, an extension I built that integrates local AI models via Ollama for code explanation and enhancement suggestions.
GitHub: github.com/Abdulkader-Safi/clarifai
Key Features
- Real-time streaming responses from Ollama
- Support for multiple AI models (Mistral, CodeLlama, DeepSeek-Coder)
- Code explanation and enhancement suggestions
- Markdown rendering with syntax highlighting
- Language auto-detection
Integrating Ollama
Here's the core pattern for streaming AI responses:
// src/services/OllamaService.ts
import * as vscode from "vscode";

interface OllamaModel {
  name: string;
  modified_at: string;
  size: number;
}

interface StreamChunk {
  response: string;
  done: boolean;
}

export class OllamaService {
  private baseUrl = "http://localhost:11434";

  async getAvailableModels(): Promise<string[]> {
    try {
      const response = await fetch(`${this.baseUrl}/api/tags`);
      const data = (await response.json()) as { models: OllamaModel[] };
      return data.models.map((m) => m.name);
    } catch (error) {
      vscode.window.showErrorMessage(
        "Failed to connect to Ollama. Is it running?"
      );
      return [];
    }
  }

  async *streamCompletion(
    model: string,
    prompt: string
  ): AsyncGenerator<string> {
    const response = await fetch(`${this.baseUrl}/api/generate`, {
      method: "POST",
      headers: { "Content-Type": "application/json" },
      body: JSON.stringify({
        model,
        prompt,
        stream: true,
      }),
    });

    const reader = response.body?.getReader();
    const decoder = new TextDecoder();

    if (!reader) {
      throw new Error("No response body");
    }

    while (true) {
      const { done, value } = await reader.read();
      if (done) break;

      const chunk = decoder.decode(value);
      const lines = chunk.split("\n").filter((line) => line.trim());

      for (const line of lines) {
        try {
          const json = JSON.parse(line) as StreamChunk;
          if (json.response) {
            yield json.response;
          }
        } catch {
          // Skip invalid JSON
        }
      }
    }
  }
}
Building the Code Analysis Feature
// src/commands/analyzeCode.ts
import * as vscode from "vscode";
import { OllamaService } from "../services/OllamaService";

export async function analyzeCode(
  webview: vscode.Webview,
  model: string,
  code: string,
  language: string,
  mode: "explain" | "enhance"
) {
  const ollama = new OllamaService();

  const prompts = {
    explain: `You are a code expert. Explain this ${language} code clearly and concisely:

\`\`\`${language}
${code}
\`\`\`

Provide:
1. What the code does
2. Key concepts used
3. Potential issues or improvements`,

    enhance: `You are a senior ${language} developer. Review this code and suggest improvements:

\`\`\`${language}
${code}
\`\`\`

Focus on:
1. Performance optimizations
2. Best practices
3. Code readability
4. Potential bugs`,
  };

  // Stream the response to the webview
  let fullResponse = "";

  for await (const chunk of ollama.streamCompletion(model, prompts[mode])) {
    fullResponse += chunk;

    // Send incremental updates to webview
    webview.postMessage({
      type: "analysisChunk",
      content: fullResponse,
    });
  }

  // Signal completion
  webview.postMessage({
    type: "analysisComplete",
    content: fullResponse,
  });
}
Getting Selected Code
// src/utils/editor.ts
import * as vscode from "vscode";

export function getSelectedCode(): {
  code: string;
  language: string;
} | null {
  const editor = vscode.window.activeTextEditor;
  if (!editor) return null;

  const selection = editor.selection;
  const code = editor.document.getText(selection);

  if (!code.trim()) return null;

  return {
    code,
    language: editor.document.languageId,
  };
}
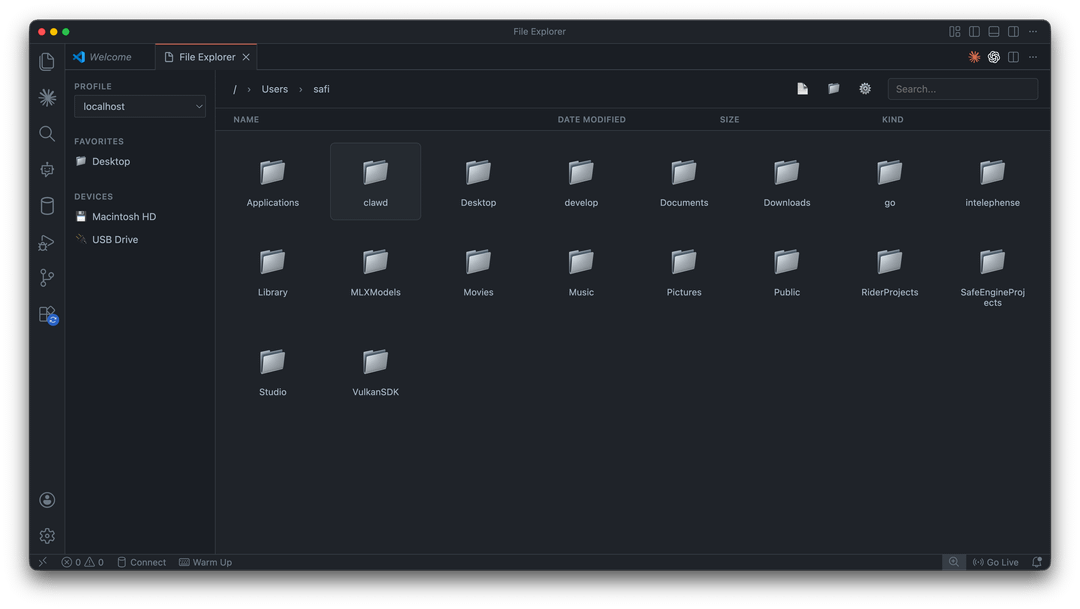
Case Study 2: File Explorer - Advanced File Management
The File Explorer extension demonstrates complex file system operations, including SSH/SFTP remote connections.
GitHub: github.com/Abdulkader-Safi/vscode-file-explorer
Key Features
- Custom file browser webview UI
- Image previews for common formats
- SSH/SFTP remote file system support
- Secure credential storage
- Profile-based favorites
- Drag-and-drop operations
Working with the File System API
// src/services/FileSystemService.ts
import * as vscode from "vscode";
import * as path from "path";
import * as fs from "fs/promises";

export interface FileInfo {
  name: string;
  path: string;
  isDirectory: boolean;
  size: number;
  modified: Date;
  extension: string;
}

export class FileSystemService {
  async readDirectory(dirPath: string): Promise<FileInfo[]> {
    const entries = await fs.readdir(dirPath, { withFileTypes: true });

    const fileInfos = await Promise.all(
      entries.map(async (entry) => {
        const fullPath = path.join(dirPath, entry.name);
        const stats = await fs.stat(fullPath);

        return {
          name: entry.name,
          path: fullPath,
          isDirectory: entry.isDirectory(),
          size: stats.size,
          modified: stats.mtime,
          extension: path.extname(entry.name).toLowerCase(),
        };
      })
    );

    // Sort: directories first, then by name
    return fileInfos.sort((a, b) => {
      if (a.isDirectory && !b.isDirectory) return -1;
      if (!a.isDirectory && b.isDirectory) return 1;
      return a.name.localeCompare(b.name);
    });
  }

  async createFile(filePath: string, content: string = ""): Promise<void> {
    await fs.writeFile(filePath, content);
  }

  async createDirectory(dirPath: string): Promise<void> {
    await fs.mkdir(dirPath, { recursive: true });
  }

  async delete(targetPath: string): Promise<void> {
    const stats = await fs.stat(targetPath);
    if (stats.isDirectory()) {
      await fs.rm(targetPath, { recursive: true });
    } else {
      await fs.unlink(targetPath);
    }
  }

  async rename(oldPath: string, newPath: string): Promise<void> {
    await fs.rename(oldPath, newPath);
  }
}
Secure Credential Storage
VS Code provides a Secret Storage API for sensitive data like SSH passwords:
// src/services/CredentialService.ts
import * as vscode from "vscode";

export class CredentialService {
  constructor(private secrets: vscode.SecretStorage) {}

  async storeSSHCredentials(
    connectionId: string,
    credentials: {
      password?: string;
      privateKeyPath?: string;
      passphrase?: string;
    }
  ): Promise<void> {
    const key = `ssh-credentials-${connectionId}`;
    await this.secrets.store(key, JSON.stringify(credentials));
  }

  async getSSHCredentials(connectionId: string): Promise<{
    password?: string;
    privateKeyPath?: string;
    passphrase?: string;
  } | null> {
    const key = `ssh-credentials-${connectionId}`;
    const stored = await this.secrets.get(key);
    return stored ? JSON.parse(stored) : null;
  }

  async deleteSSHCredentials(connectionId: string): Promise<void> {
    const key = `ssh-credentials-${connectionId}`;
    await this.secrets.delete(key);
  }
}
Image Preview in Webviews
// In your webview provider
private async getImageAsBase64(imagePath: string): Promise<string> {
  const imageBuffer = await fs.readFile(imagePath);
  const base64 = imageBuffer.toString('base64');
  const extension = path.extname(imagePath).toLowerCase();

  const mimeTypes: Record<string, string> = {
    '.png': 'image/png',
    '.jpg': 'image/jpeg',
    '.jpeg': 'image/jpeg',
    '.gif': 'image/gif',
    '.svg': 'image/svg+xml',
    '.webp': 'image/webp',
  };

  const mimeType = mimeTypes[extension] || 'image/png';
  return `data:${mimeType};base64,${base64}`;
}
Testing Your Extension
Unit Testing with Mocha
// src/test/suite/extension.test.ts
import * as assert from "assert";
import * as vscode from "vscode";

suite("Extension Test Suite", () => {
  vscode.window.showInformationMessage("Starting tests...");

  test("Extension should be present", () => {
    assert.ok(vscode.extensions.getExtension("publisher.my-extension"));
  });

  test("Extension should activate", async () => {
    const extension = vscode.extensions.getExtension("publisher.my-extension");
    await extension?.activate();
    assert.strictEqual(extension?.isActive, true);
  });

  test("Command should be registered", async () => {
    const commands = await vscode.commands.getCommands();
    assert.ok(commands.includes("myExtension.helloWorld"));
  });
});
Running Tests
# Run tests
npm test

# Or use the VS Code test runner
# Press F5 with "Extension Tests" configuration selected
Publishing to the Marketplace
Prerequisites
- Create a Microsoft account
- Create an Azure DevOps organization
- Generate a Personal Access Token (PAT)
- Install vsce:
npm install -g @vscode/vsce
Preparing for Publication
Update your package.json with required fields:
{
  "name": "my-extension",
  "displayName": "My Extension",
  "description": "A useful VS Code extension",
  "version": "1.0.0",
  "publisher": "your-publisher-name",
  "repository": {
    "type": "git",
    "url": "https://github.com/username/my-extension"
  },
  "icon": "media/icon.png",
  "categories": ["Other"],
  "keywords": ["productivity", "tools"],
  "engines": {
    "vscode": "^1.105.0"
  }
}
Building and Publishing
# Package the extension
vsce package

# This creates my-extension-1.0.0.vsix

# Publish to marketplace
vsce publish

# Or publish with version bump
vsce publish minor  # 1.0.0 -> 1.1.0
vsce publish patch  # 1.0.0 -> 1.0.1
.vscodeignore
Exclude unnecessary files from your package:
.vscode/**
.vscode-test/**
src/**
node_modules/**
.gitignore
*.map
**/*.ts
!dist/**
tsconfig.json
esbuild.js
.eslintrc*
Best Practices and Tips
Performance
- Lazy Loading: Don't load heavy resources until needed
- Debounce Events: Especially for
onDidChangeTextDocument - Use Caching: Cache expensive computations
- Dispose Resources: Always clean up in
deactivate()and usecontext.subscriptions
User Experience
- Progressive Enhancement: Start with basic features, add complexity gradually
- Provide Feedback: Use progress indicators for long operations
- Graceful Degradation: Handle errors without crashing
- Settings: Make features configurable
Security
- Content Security Policy: Always set CSP for webviews
- Input Validation: Sanitize user input
- Secret Storage: Never store credentials in plain text
- HTTPS: Use secure connections for external APIs
Resources and Templates
Open Source Examples
- ClarifAI - AI code analysis: GitHub | Marketplace
- File Explorer - Advanced file management: GitHub | Marketplace
- React Starter Template: GitHub
Official Documentation
Conclusion
VS Code extension development in 2026 combines modern web technologies with powerful desktop APIs. Whether you're building AI-powered tools like ClarifAI, complex file managers like File Explorer, or simple productivity boosters, the patterns remain consistent: TypeScript for type safety, esbuild for fast builds, React for rich UIs, and thoughtful API design for great user experiences.
The React starter template gives you a foundation to build upon, while the real-world examples show what's possible when you push the boundaries. Start small, iterate quickly, and don't be afraid to publish early—the VS Code Marketplace is where your extensions find their users.
Have questions or want to share your extensions? Connect with me on LinkedIn or explore more projects at abdulkadersafi.com/projects.

Building scalable systems and developer-first tools. Lead Software Engineer at DSRPT.

Frequently asked
-
Target the latest stable version minus 2-3 months. This covers most users while giving you access to newer APIs. Currently, 1.105.0 is a good baseline.
-
Yes. Any Node.js package works in the extension host. For webviews, any browser-compatible package works.
-
Open the Command Palette and run "Developer: Open Webview Developer Tools" while your webview is open.
-
For simple UIs, vanilla JS is fine. For anything with state management, forms, or complex interactions, React saves significant development time.
-
Use Node's path module instead of string concatenation. VS Code handles most cross-platform concerns, but file paths need care.